In the previous articles, I talked about the Aperture and the shutter speed. This time, we will talk in detail about the third and last parameter to adjust the exposure during shooting: the ISO sensitivity.
I will explain in details; what is ISO and how its work in photography
ISO Sensitivity
Table of Contents
We will first see what the ISO sensitivity is and what is its effect on exposure. Then, we will see the notion of digital noise and what are the factors that favor it. Finally, I will tell you in which situations it is necessary to increase the ISO sensitivity.
What is ISO in Photography
 You must know that to form an image, it is necessary for a sensitive surface to record light. It is this process which is called the exhibition and which is at the base of our photos.
After entering the camera, the light ends its race on a photosensitive surface. In film photography, light is used to mark film or film. In digital photography, it is the sensor that receives the light.
Whatever the surface used, the photographer has the choice between several sensitivities. Thus, an insensitive surface stores little light while a very sensitive surface stores a lot of light. Thanks to this range of sensibilities, the photographer can adapt to the different intensities of light that he encounters.
With a film camera, one must choose a film whose sensitivity best corresponds to the shooting conditions. For example, to take pictures in low light you need a film more sensitive than to shoot in the middle of a sunny day.
With camera digital, everything is much simpler! The sensitivity of the sensor is changed directly in the housing settings. The huge advantage is that you can change the sensitivity between two photos, while in film photography you have to wait to finish the film.
To designate the sensitivity of the sensor to light, a reference scale is used: the ISO ( International Standard Organization ) sensitivity.
The higher the ISO value, the more sensitive the sensor is to light. A small ISO value (100, 200) therefore corresponds to low sensitivity, while a high ISO value (3200, 6400) has a high sensitivity.
Let’s take another important point. Each time the ISO value is doubled, the sensitivity of the sensor to light is doubled. So, if you go from 200 to 400 ISO, the sensor is twice as sensitive to light. On the other hand, if you go from 800 to 400 ISO the sensor is half as sensitive.
In summary :
- Small ISO value (200) = sensor insensitive to light = little light stored
- High ISO value (6400) = sensor very sensitive to light = a lot of light stored
To illustrate the role of the ISO setting on the exposure, let’s take an example. For that, I took a series of three photos and I varied the ISO sensitivity. Aperture (f / 5.6) and shutter speed (1/125 s) is fixed for all three shots.

If I double the ISO value (400), the sensor is twice as sensitive. It stores more light and the photo is logically clearer.

Conversely, if I divide the ISO value by two (100 ISO), the sensor is half as sensitive as 200 ISO. It stores less light and the picture is darker.

Digital Noise Definition
We have just seen that the ISO sensitivity increases the sensitivity of the sensor to light. This setting is especially useful in low light because the sensor can store more light.
Unfortunately, this has a cost … By increasing the ISO sensitivity, the amount of digital noise on the image is increased at the same time.
The noise is sometimes compared to the grain we meet on silver prints. However, it does not have the advantages. Digital noise appears randomly on the surface of the image. It is particularly present in dark and uniform areas. It, therefore, tends to degrade the image quality rather than to bring an aesthetic side.
To see the relationship between ISO sensitivity and digital noise, I suggest you look at a picture of our previous subject with high sensitivities. Feel free to click on the photos to view them big and better to see the noise.


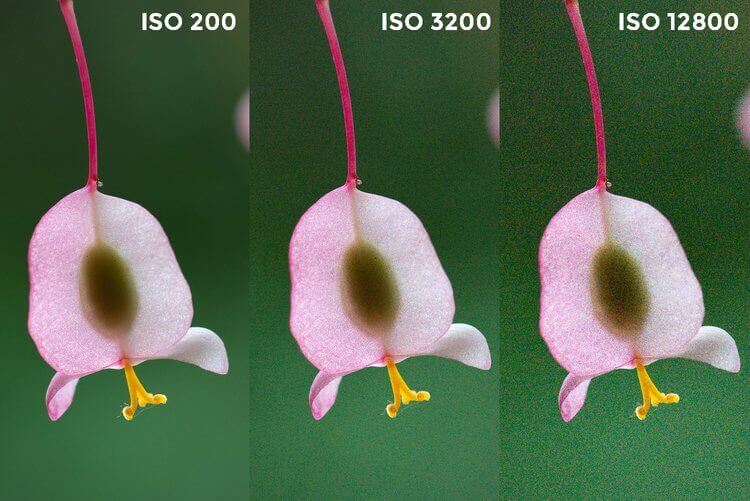
If you have trouble distinguishing digital noise, we will compare a detail of each photo taken with different ISO sensitivities.

At ISO 200, the image is “clean”, digital noise is absent. At 3200 ISO, we begin to see a fine mottling on the green background. At 12800 ISO, the noise is very present: we observe a very pronounced granulation which is superimposed on the image.
In summary :
- Small ISO value (200) = Sensor not very sensitive to light = Little stored light = Little digital noise
- High ISO value (6400) = very sensitive sensor to light = a lot of stored light = a lot of digital noise
Factors that promote digital noise
You now know that by increasing the ISO sensitivity, the amount of noise is greater in the image. But you must also know that it is not the only responsible!
Here is a list of the main factors that can affect the amount of actual or observed noise:
- The size of the sensor: the large sensor devices to better manage noise as small sensor devices. For example, if your case has a full-size sensor it will be better than a case with an APS-C sensor.
- The exposure time: the number of noise increases as one lengthens the exposure time (or that uses a slower shutter speed).
- The size of the image: the larger the image is printed or displayed, the more the noise is visible. For example, the noise is not apparent in an image viewed on a computer screen at 20% of its size or printed in a small size.
- The post-processing: the extensive retouching generate digital noise, especially in uniform and dark areas.
If at the same time you use a camera with a small sensor, a high ISO speed, a long exposure time and you see your image at 100%, you meet all the conditions to have a lot of noise!
Nevertheless, it is important to note that camera manufacturers have made great progress in recent years. While the increase in sensitivity was a delicate maneuver, it is now possible to use higher values without digital noise being too much present.
Finally, remember that you can also reduce noise at post-processing. Specialized software like Lightroom or DxO PhotoLab offers powerful tools in this field. If the amount of noise is not too important, just play a few sliders to get a “clean” picture.
When to increase the ISO sensitivity?
We have just seen that the increase of the ISO sensitivity is accompanied by a degradation of the image quality. You are probably wondering at this point why it is necessary to increase the ISO sensitivity and in which situations it is most useful. Let’s see all this in detail!
In ideal conditions where light is abundant, the ISO setting is not very interesting. A simple adjustment of the aperture and the speed makes it possible to realize almost all the possible photos in terms of exposure. That is why, when the light is abundant, it is recommended to use a low sensitivity: 100 or 200 ISO.
However, you will also face situations where light is not present in sufficient quantity: shots indoors, at the beginning or end of the day, in the forest, etc. To provide the sensor with the amount of light needed for a correct exposure you will first play on the two parameters of aperture and speed.
For example, you can open the larger diaphragm to let more light through the lens. But you will encounter two difficulties :
you can not open more than the maximum aperture of your lens
you sometimes need a large depth of field and therefore a small opening
If you decide to change the shutter speed and let the sensor stay in the light for longer, you will be faced with two additional difficulties :
slow speed causes camera shake by shooting freehand
slow speed does not freeze the movement of a subject
It is when you have to deal with these difficulties that the ISO setting makes sense. It appears as a backup solution when it is no longer possible to change the aperture and / or speed.
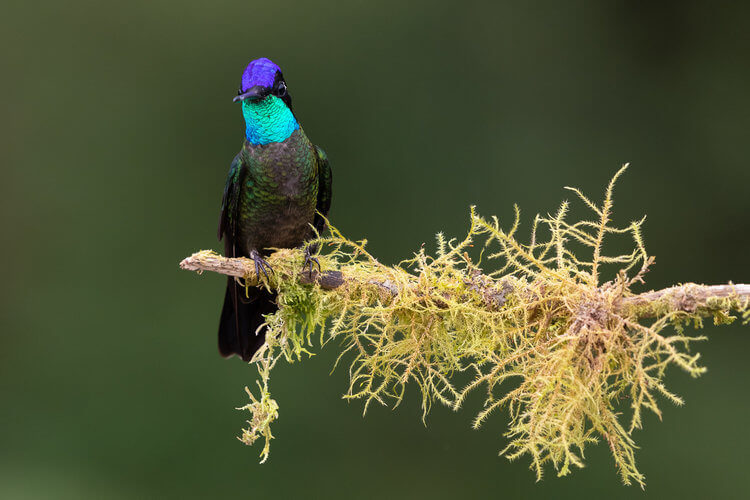
I now propose to look at a practical example where I needed to increase the ISO sensitivity. This photo of a Rivoli’s Hummingbird – was taken in the mountains of Costa Rica.
At the time of the shooting, it was late afternoon and the sky was overcast. As much to tell you that the light was not very abundant.

With an ISO sensitivity of 200, the camera would show me the following settings to ensure proper exposure: f / 5.6 for aperture and 1/40 sec for shutter speed.
But that speed was a bit of a snap for freehand photography, especially since I was using a telephoto lens. With a focal length of 360 mm, I needed a faster speed to prevent camera shake.
As I was already at the maximum aperture of my lens ( f / 5.6 ), my only recourse was to increase the ISO sensitivity. By setting my camera to 1000 ISO, I was able to enjoy a speed of 1/200 s and get a sharp picture.
How do I use ISO in Photography on a daily basis
Knowing that I have a hybrid camera with microsensor 4/3, I always try not to climb too much in ISO:
- Out in good weather, I can leave my ISOs at the lowest
- When the weather is over, I can go up to 800 ISO
- When bad weather comes up, I lock my ISO value automatically with a maximum value at 3200 ISO
- If I have a tripod with me, I always leave my ISO value at its lowest by adjusting my exposure time.
- In macro photography, I’m in automatic ISO
It’s up to you to make your own tests in order to know the acceptable limits of ISO on your images. In any case, I hope you will understand what the ISO value and how to use it best for your shots.
Conclusion
You must now know the basics of ISO sensitivity. We have seen how works this setting, in which situations to use it and what is the return on the image quality.
The ISO sensitivity is a convenient setting because it brings a certain comfort at the time of the shooting. When you can not operate the iris aperture or shutter speed, you can then operate the third lever to make your shots successful!
This was all about What is ISO in Photography, I hope you enjoy my article. Feel free to submit your feedback in the comment box.
