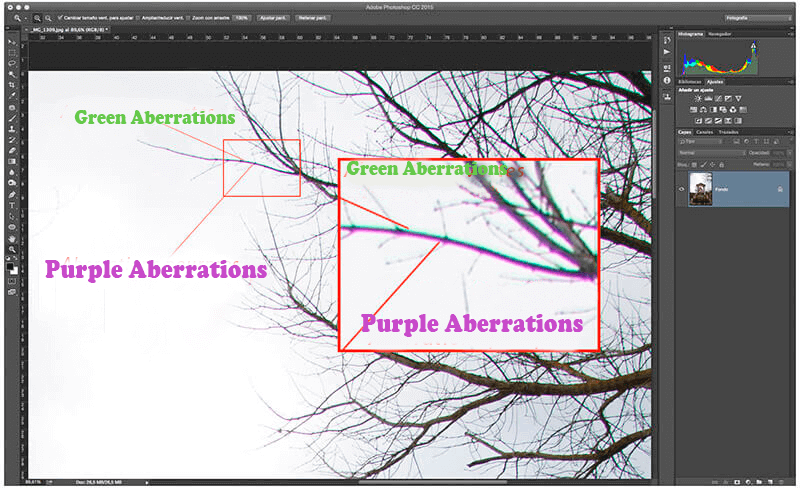
Have you ever taken pictures that, when you opened them on your computer, contained lines of color around all the objects, especially on the ends of the frame and on the wide-angle shots?
These colored edges or halos are the chromatic aberrations, which, although they do not render the photos unusable, are disturbing and degrade them.
In this article, we will explain what they are, how to prevent them and how to correct these chromatic aberrations.
What is Chromatic Aberration
Table of Contents
We are not going to give you lessons in physics or optics, but it’s interesting to know what they are and why they are happening so that you know how to prevent them and learn how to avoid them.
The first point that we must clarify is that we all studied in college, that the light is formed of radiation of different wavelengths that each correspond to a color. Newton’s experiment of passing through a glass prism through a beam of white light, causing it to disperse into seven colors, which are the colors of the rainbow, is the most obvious proof of this phenomenon.

Perhaps you also know the phenomenon of optical refraction, which is a change of direction of a beam of light when the latter changes propagation mode. This refraction is dependent on the type of mode by which the light propagates, for example, the air or the vacuum in a lens.

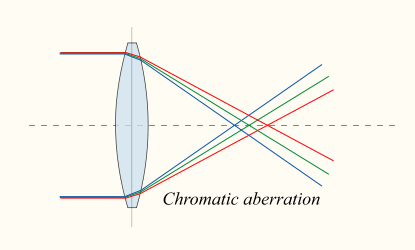
However, it is less known that this refraction does not affect in the same way all the wavelengths (which are the colors) which constitute the light beam. Thus, some wavelengths have refractive indices different from others, although the material or the propagation medium (the objectives) is the same.
There are also other “aberrant” phenomena such as diffraction, however, we do not intend to give you lessons in physics, but rather to teach you how to solve chromatic aberration problems in your photos.
And what does it mean? Well, during the creation of the image, the objectives are not able to focus, at the same distance, on the different colors, that is why there appear color halos that pass in front of or fall behind the image, generating these lines of colors: chromatic aberrations.

To explain this more simply, imagine a jet of colored inks that mix through the mouth of a pipe. If the mixture was perfect all the inkjet would have an impact on the same point and we could draw or paint with the color resulting from the mixture. One could, for example, draw a house. But now, suppose that the mixture is not perfect and that when the jet will have an impact on the wall or on the canvas, some of the colors of the mixture deviate by a few millimeters.
What would happen? Well while we are painting the house, along with our drawing, there would be an outline produced by that part of the ink that did not mix well. In a very simplified way, this is how things happen chromatic aberrations.
How to prevent the appearance of chromatic aberrations?
1. Use quality objectives
We must use quality objectives, and we say, the quality does not necessarily expensive, it’s just that, as in almost every facet of life, the best is always a little more expensive. That being said, we can talk about low chromatic dispersion lenses, which thanks to the materials that make up its design and lens, are able to minimize this deviation of the light beam and prevent chromatic aberrations from occurring or reduce them significantly.
2. Avoid “wide-angle”
If your lens is not of good quality, avoid as much as possible the use of angles, or worse of wide-angle, since in this way you force a large part of the light to enter the lens more obliquely.
To explain this, we can equate a wide-angle lens with a funnel with the broad part towards the “model or landscape” and the narrow part up to the sensor. The beams of light enter through the wide portion, entering at different angles with respect to the sensor. The larger the angle, the more light beams that enter the funnel can be oblique, resulting in larger refraction angles and therefore maximized error and more chromatic aberrations formed if the lens had less open-angle.
If your lens tends to cause chromatic aberrations maybe you will have to use larger focal lengths and then climb a panorama.
3. Do not use maximum openings
Also, avoid maximum lens apertures, as they will allow more oblique light beams to pass through that will scatter the beam and cause aberrations. Take your photos with a more closed diaphragm that lets only the most frontal light beams pass through, and with a more closed angle of refraction, so you will also avoid any aberrations.

4. Avoid too many contrasting elements
Try to avoid that on the edges of the frame there are elements with a great contrast between them and the bottom, otherwise, the aberrations not only will not be avoided but will also be more obvious.
5. Do not work with extreme focal distances
If you have an introductory zoom lens, try not to work on the focal ends. For example, if you have a 17-85, you can work from 24 mm to 70 mm. This does not mean that you should no longer use these distances, but at least in the situations mentioned earlier, you should moderate their use if you want to avoid chromatic aberrations.

6. Taking pictures in RAW format
This last point is not to be taken as advice but as an obligation: take your photos in RAW format. This will not prevent the aberrations but will help you correct them and eliminate them.
How to correct chromatic aberrations?
There are three methods to correct chromatic aberrations: Automatic, Semi-automatic, and Manual, and in the latter case, there will be different ways to address the elimination of these aberrations.
Automatic mode
To automatically remove chromatic aberrations from an image, you need to use the ” RAW Camera Filter ” in the Photoshop Filters menu. Once this filter is open, click on the ” Lens Correction ” section, which is the icon of an objective lens.

In the ” Color ” tab , check the ” Remove chromatic aberration ” box . By selecting this option, you will see that automatically, a lot of the aberrations will be eliminated. Now click OK and you will see how the images will be much cleaner without the aberrations, even if they have not been completely eliminated.

Semi-automatic mode
With this mode, you will be able to virtually eliminate all chromatic aberrations. You have to do the same thing as above: in the filter menu, click on ” RAW camera filter ”, enter in the ” Lens correction ” section and click on the option again ” Remove chromatic aberration ” in the ” Color ” tab.

Now, before accepting, go to the “Eliminate Halos” slider. There are two types of halos: purple and green. First, focus on the “purple amount” slider and gradually increase its value. You will see how the aberrations and halos disappear completely. You should not abuse this setting since you can create halos on the other side of the spectrum in another area of the image. To do this, move slowly until the purple aberrations disappear.

The purple slider almost never has to be touched, because the range of tones it has by default is the most correct. After finishing with purple, do the same with the amount of green and you will see how the image will be completely free of halos or chromatic aberrations.

Manual methods
The manual methods are many and varied, but the truth is that since we discovered the power of the semi-automatic lens correction filter, they are almost never used. But, just in case you have an older version of Photoshop that does not have this feature or for any other reason, we’ll explain how.
Before you begin you should know that this method is reserved for strongly contrasting elements, where aberrations appear most often. With the ” Clone ” tool, a high opacity around 90%, a zero hardness, in ” Color ” mode, and showing the sampling in zones of “sky” or “clear”, it is necessary to pass on all the different color traces of the aberrations and you will see that they will all disappear.
You can work on a new empty layer by selecting in the options of the tool ” Clone ” which displays “The current layer is lower” , which will allow you to see the overall before and after. This process is very tedious if you have, as in this picture, many branches of trees or elements likely to generate aberrations, but this can happen to any other area of the image.

There are many other manual methods that work the same way, but we emphasize that with automatic and semi-automatic modes, you will solve most situations faster and more efficiently.
Video Tutorial: Correcting Chromatic Aberrations
In the video that we will present below, you will be able to see in real-time how easy it is to correct the chromatic aberrations with the automatic and semi-automatic modes compared to the manual form and you will be able to judge by yourself Even the latter is not worth it: the results are obvious.
[youtube https://www.youtube.com/watch?v=lRMQuu6ZpnA]It is hoped that this article will help you fight the dreaded chromatic aberrations in different ways. And, as always, you are asked to share your experiences or any questions in the comments below.
