The aperture is one of the three parameters (with the shutter speed and ISO sensitivity) to control the exposure of an image during shooting. Openness also plays an important role in terms of creativity because it has an impact on the depth of the field.
If you want to leave the Auto mode of your camera, this is one of the first settings you should be interested in.
In this article, we will see in detail what the openness in the photo, how it is noted and that they are the standard values. Then we will see with practical examples of how it affects the exposure and the depth of field of our photos.
What is Aperture
Table of Contents
In short, the Aperture has to do with the opening or closing of a camera lens to allow or prohibit different levels of light. The lens DSLRs have an iris inside, which opens and close to allow some amount of light reaching the camera sensor. The aperture of the camera is measured in apertures.
Aperture has two functions on a digital SLR. In addition to controlling the amount of light passing through the lens, it also controls the depth of field.
When you take pictures with an advanced camera, you will want to understand the aperture. By controlling the opening of the camera lens, you will greatly change the way your photos look.
By opening the diaphragm larger or smaller, it is possible to control the amount of light that passes through the lens to reach the sensor. Thus, we can logically say that:
- A large opening lets a lot of light.
- A small opening lets little light.
The diaphragm is sometimes compared to the pupil of an eye. When light is abundant, the pupil retracts to limit the amount of light entering the eye. When it is dark, the pupil expands to allow more light to pass through. The diaphragm plays an equivalent role for the camera sensor.
Explain Aperture Through Video
[youtube https://www.youtube.com/watch?v=RhIBlg1ld2g]How do you write the Aperture?
The opening of the diaphragm is written with a number preceded by the letter f, for example, f / 16, f / 8, f / 4, and so on.
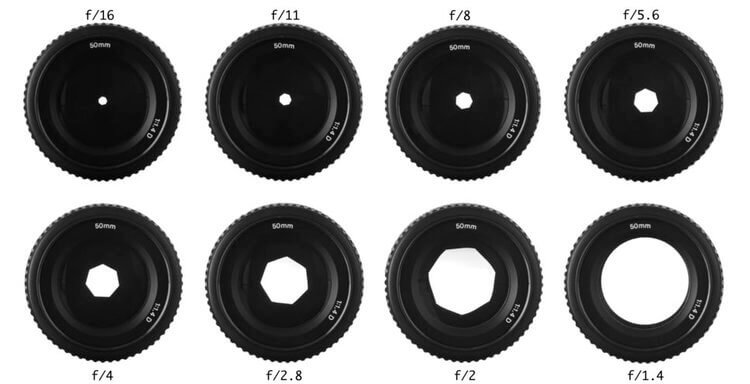
- The larger the opening number (f / 16), the smaller the opening.
- The smaller the opening number (f / 1.4), the larger the opening.
To fully understand the relationship between the actual aperture opening and the aperture value, I suggest you look at the illustration below.

This writing is sometimes confusing because we would expect it to be the opposite …
To understand this paradox, we must know that the opening values are actually fractions. If you want to know the diameter of the opening just divide the focal length (f) of your lens by the number of apertures.
For example, if you use a 100mm lens with f / 4 aperture, the aperture diameter measures 100/4 = 25mm. If you use a 100 mm with an aperture of f / 16, the diameter of the aperture then measures 100/16 = 6.25 mm.
We can deduce that to let a lot of light, we must use a small aperture value (f / 4, for example). Conversely, to let little light pass, it is necessary to use a great value (f / 16, for example).
In summary :
- Small number (f / 1.4) = Large opening = a lot of light
- Large number (f / 16) = Small aperture = little light
What are the standard values of Aperture?
To write the opening, there are standard values :
f / 32 – e / 22 – e / 16 – e / 11 – e / 8 – e / 5.6 – e / 4 – e / 2.8 – e / 2 – e / 1.4 – e / 1
Each time we go from one standard value to another one multiplies or divides by two the surface of the opening and thus the quantity of light that crosses the objective.
For example, a diaphragm open at f / 5.6 passes twice as much light as an open diaphragm at f / 8. A diaphragm open at f / 11 passes half the light of a diaphragm open at f / 8.
You will not find all these opening values on your goal. Large apertures (f / 2.8, for example) require an elaborate optical construction, especially if it is a zoom.
That’s why we find rather these large openings on high-end zooms. Entry-level zooms should generally be limited to a maximum aperture of f / 3.5.
We have just seen that there are standard values for the opening of the diaphragm. But you may have already noticed that you could choose other openings on your camera? The reason is quite simple, most objectives allow to choose intermediate values : f / 5 – f / 7.1 – f / 10 – f / 13 …
Opening and Exhibition
Now that you know the theory, we are going to practice. From a concrete example, I will show you the impact of opening the diaphragm on exposure.
For the series of photos below, I changed the aperture – and only the aperture – after taking the first picture at f /8.

If I now open the diaphragm at f /5.6, I let twice more light. You can notice in the following picture that this change of opening has a direct impact. The image becomes clearer because the sensor has received more light.

If now, I close the diaphragm at f /11, look at the result on the photo below. As I let half-light pass (with an aperture of f / 8), my photo logically becomes darker.

With the opening of the diaphragm, you have a lever to act on the exposure of your photos.
- When the light is strong, you can close the diaphragm to avoid overexposing your photo.
- When the light is dim, you can open the diaphragm to avoid under-exposing your photo.
Opening and Depth of Field
You now know that opening the diaphragm allows you to adjust the amount of light that passes through the lens to control exposure.
But that’s not all! We will see that choosing an opening is not limited to measuring the amount of light. This also has an impact on a very important parameter in photography: the depth of field.
You have probably heard of this notion before, but let’s do a quick reminder. Depth of field refers to the extent of the sharpness area of a photo.
- With a shallow depth of field, only a small part of the image is sharp. This is the precise area where the focus was made.
- With a large depth of field, it’s the opposite. The image has an area of sharpness.
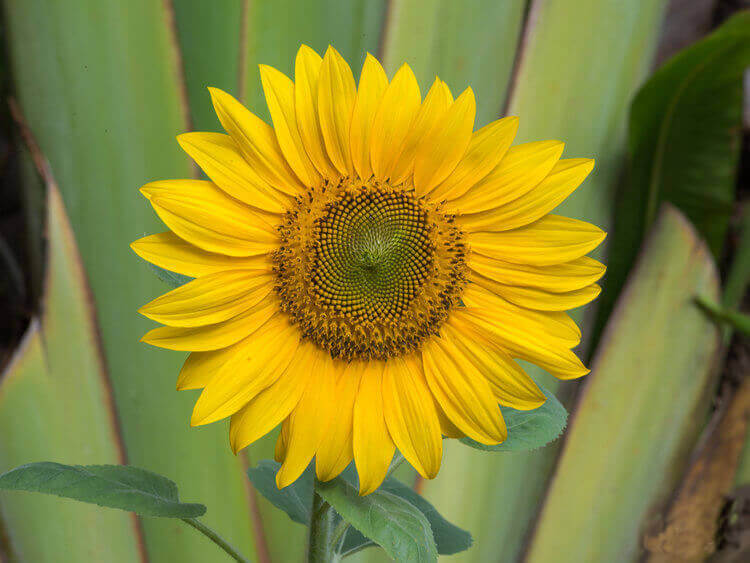
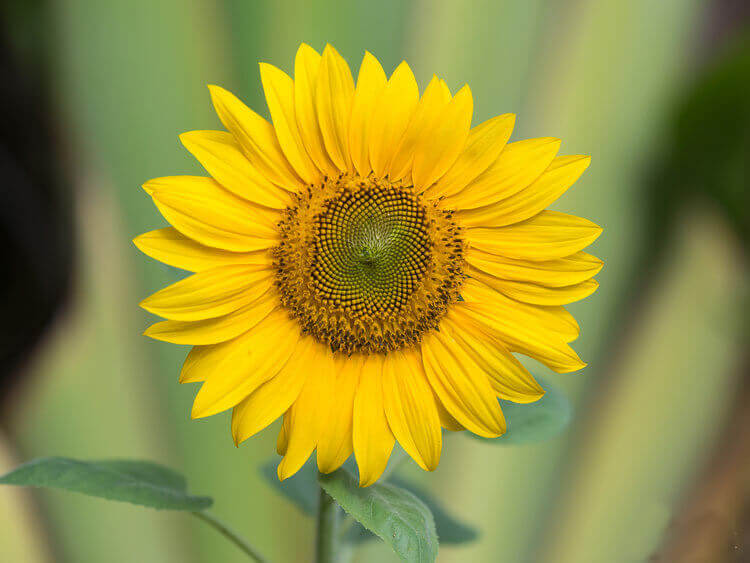
After having defined the notion of depth of field, let’s see how the adjustment of the aperture of the diaphragm actually influences it. For this, I photographed a sunflower using two very different openings.

With an aperture of f /22, the background is clearly visible. Even if it is a little vague, one can easily distinguish the elements that compose it.
Now, look at the photo of the same subject photographed with an aperture of f /4. This time the background is much more blurry, which means that the sharpness area has shrunk.

From this example, we can deduce that a large aperture (f / 4) results in a smaller depth of field than a small aperture (f / 22).
It is important to note that these two photos have the same exposure. The sensor received exactly the same amount of light. To compensate for the excess light caused by opening the diaphragm (from f / 22 to f / 4), I simply increased the shutter speed (from 1/50 sec to 1/1600 sec).
If these photos are equivalent to the level of the exhibition, they are however different in terms of creativity. Choosing this or that opening is not random. It’s a balance between technical necessity and artistic choice.
With a shallow depth of field, the flower stands out from the background and the bokeh is prettier. With a greater depth of field, the flower is superimposed on the background and she had trouble getting out.
It should also be mentioned that the choice of depth of field is often dictated by the type of photo we practice.
For a portrait, it is generally sought that the subject is detached from the background. A large aperture is then used to obtain a narrow depth of field and focus the viewer’s attention on the subject.
For a landscape, it’s the opposite. We try to make the whole image clear, from the foreground to the background. This favors a small aperture to obtain an extended depth of field.
Now that you know the role of openness on the depth of field, we can complete our previous summary:
In summary:
- Small number (f / 1.4) = Large aperture = a lot of light = shallow depth of field
- Large number (f / 22) = Small aperture = little light = large depth of field
Conclusion
After reading this article, you should master the basics of opening the diaphragm. I hope this has helped you and that you better understand the impact of openness on exposure and depth of field.
If you have any questions, do not hesitate to leave a comment to ask them. And if you liked the article, do not forget to share it with your photographer friends!
