Macro photography focuses on small or very small subjects. Flowers and insects are favorites. But also many other inanimate objects such as water droplets, snowflakes, jewels, and precious stones.
With macro photography, any subject that, when enlarged, is able to reveal aspects that are usually “invisible” can become fascinating.
This kind of photo, however, cannot be improvised. Macro photography, in fact, has technical requirements that go beyond other photographic genres.
At the first shooting attempts you will notice that:
- your lens cannot focus from a short enough distance,
- the subject is never quite detached from the background,
- the subject is not magnified enough,
- shadows and lights become unmanageable,
- shutter speeds that you thought fast are not enough to freeze the subject,
- millimeter movements ruin the photo.
In this guide, I’ll tell you how to solve each of these problems. I will also advise you which equipment to buy to get interesting results even if you start from scratch (and don’t have Mary Poppins’ wallet).
At the end of the reading, you will have all the elements necessary to achieve your purpose: taking great macro photos.
 What features should macro lenses have?
As you may have understood, macro photography requires lenses with specific technical characteristics. Unfortunately, the lenses you already have are unlikely to be good for macro photography. Here’s what you need to watch out for:
- minimum focus distance
- enlargement ratio
- minimum working distance.
Let’s see them in detail.
 Minimum focus distance
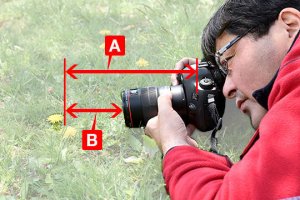
To take a close-up photo, you have two options: increase the focal length of the lens or physically reduce the distance between you and the subject.
In the second option, the lens’s minimum focusing distance comes into play. You will have noticed: that when you take a photo under a certain distance, your lens is no longer able to focus.
If in doubt, you can test your goal with a practical exercise. Place a small object on a coffee table. Focus on it once, then move closer and closer, continuing to focus.
Below a certain distance, you will notice that the focus motor of your lens will start spinning. That limiting distance is the minimum focusing distance of the lens.
It is a physical limitation, due to the optical design of the lens, you can not do anything about it. Each lens has its own minimum focusing distance, declared by the manufacturer. To learn more about the concept, read this article on advanced features of SLR lenses.
Wide-angle lenses have a much shorter minimum focus distance than telephoto lenses.
For example, the very widespread 18-55 mm, has a very short minimum focus distance, around 30 cm. Suppose you want to photograph a butterfly. With the wide-angle, you could try to get close to the butterfly (without frightening it) up to 30 cm.
Great: then with the 18-55 you can already take macro photos? No, I’m sorry. The magnification is not enough: the focal length is very short.
By using a telephoto lens, on the other hand, you get higher magnification. The problem this time around is that a long focal length is always accompanied by an equally high minimum focus distance. Usually, it is not less than 90 cm.
So the longer focal length will allow you to bring the subject closer, but the longer they take away from the focus room will force you to move away, greatly reducing the magnification. The result will be almost worse than using the wide-angle.
 The magnification ratio
In macro photography what really matters is the magnification ratio, that is the ratio between the real size of the subject we are framing and its size on the sensor.
The magnification ratio (also called reproduction ratio), which is usually considered to be the minimum to identify a macro lens, is the 1: 1 ratio.
It means that when the camera is positioned at the closest focusing distance from the subject, the size of the subject in the photo will be equal to its actual size.
Higher ratios (e.g. 2: 1, 3: 1) result in magnification, just like using a lens or microscope. So macro photography is even more intense.
To make you understand better, I’ll give you a practical example. A camera sensor is quite small. In Nikon’s the sensor has a diagonal of 28 mm.
Having a 1: 1 magnification ratio means that a subject 28 mm long (a jewel, a coin or an insect), framing it, can occupy the entire area of the sensor (therefore of the photo).
The minimum working distance
This distance represents the minimum distance between the front of the lens and the subject necessary to obtain a magnification of 1: 1. Why is this important?
When photographing inanimate subjects, such as flowers, of which there are beautiful macro photographs, this value is of little consequence. However, macro photographers often try to immortalize insects or small reptiles, therefore living beings.
Of course, it becomes difficult to approach these subjects beyond a certain threshold, because they tend to escape. Therefore, a lens with a greater minimum working distance will allow you to stay further away from the subject. This will reduce the risk of the person escaping.
A practical example. A 50mm macro lens, to get a 1: 1 magnification, requires a distance of 7cm, enough to probably escape any insect. On the contrary, 100 mm, to obtain the same magnification, is satisfied with a distance of 14 cm, much easier.
The shooting technique in macro photography
 So far you have understood what physical characteristics the lenses suitable for macro photography must-have. At this point, the time has come to understand the photographic consequences of using a macro lens.
A lens with these characteristics has immediate repercussions on your shots. In particular, you will find yourself having to manage these situations:
- An unexpected depth of field,
- The risk of the blur,
- Very short exposure times,
- Problems with autofocus,
- A more difficult light management.
Also in this case, in the following paragraphs I will explain in detail what changes specifically and what is the best way to keep the situation under control.
An unexpected depth of field
The close range from which you take photos forces you to reevaluate the depth of field . The blurry portion of the photo increases when:
- reduce the distance to the subject,
- open the diaphragm,
- increase the distance of the subject from the background,
- increase the focal length.
The first and last points on this list are crucial in macro photography. The most used focal lengths are obviously the telephoto ones because the priority is to enlarge the subjects.
In fact, the most suitable lenses for macro photography have a focal length greater than 100mm. On top of that, the distance to the subject is much smaller than what you normally shoot at.
These two factors combined result in an extremely shallow depth of field. In many macro photographs of insects, for example, you can see that only the head is in focus. An insect is at most a few centimeters long, so you can guess how the depth of field is reduced in these cases to a couple of centimeters or less.
In macro photography, it can be useful to have a very small aperture to maximize depth of field. This can be surprising for a novice photographer.
How far do you need to close the diaphragm? There is no single answer, it obviously depends on what you are photographing, the angle from which you shoot with respect to the subject and how much of it you want in focus. However, be prepared to use apertures close to f / 8, but often much higher.
As an example, below are three photos I took of a dragonfly. To take them I didn’t use a real macro lens, but a Sigma 70-300 with the possibility of reducing the minimum focusing distance to 90cm between 200 and 300 mm, reaching a magnification of 2: 1.
In the first photo (below) I was positioned frontally, so the dragonfly’s body stretched away from me. EXIF data for this photo report 300mm focal length and f5.6 aperture. The distance from which I shot is the minimum possible, about 90cm. As you can see, only the head is in focus, while the body and part of the wings are also out of focus.
Keeping the same distance, I then tried to change the angle and close the aperture, without changing the focal length. The result obtained is below.
As you can see, more of the body is in focus than before, but still, a lot of it is out of focus. So I tried to put myself parallel to the dragonfly, which evidently liked to be photographed since it remained still for about twenty minutes. For safety I also closed the aperture to f / 11, keeping all the other variables fixed. So I got this photo.
Finally, the dragonfly is completely in focus (except for the wings). Thanks to the almost constant distance from the body, I was able to have everything in focus.
Furthermore, by stopping down, the wings were also mostly in focus, despite being perpendicular to the lens.
Alarm moved
You may think that stopping down isn’t that big of a deal. Unfortunately, due to the rules of the exposure triangle, when you close the aperture too much it is necessary to increase the ISO and/or the exposure time in order not to underexpose the photo.
However, both increases can have negative consequences. The ISO can only be raised up to a certain level, to avoid adding too much noise to the photo.
In the first and third photos above I set the ISO to 800, the security level for my camera. In fact, the noise is acceptable. More advanced cameras allow much higher ISO values.
If possible, however, it is best to always keep the ISO as low as possible. Hence it becomes necessary to increase the exposure time. This is even riskier because you can get too slow exposure times which leads to blurry photos for two reasons:
- due to the movement of the subjects (applies to insects, but also to flowers shaken by the wind),
- due to our movements (it is advisable that the denominator of the exposure time is at least equal to the focal length to avoid blurred photos).
Furthermore, adverse light conditions could force you to increase the exposure time, even more, aggravating the situation.
Very short exposure times
Sometimes the subjects for your macro photos are inanimate objects indoors and you can use a tripod. In these cases, you are free to use any shutter speed, without contraindications.
Much more often, however, it happens to want to photograph moving subjects, such as small animals or insects, which move very quickly. Or it is easy for people to happen that should stay still, but don’t. If you’ve already tried to photograph a flower up close outdoors, you know what I’m talking about.
It would seem a simple situation, with a subject inevitably posing, but a little wind is enough to make the shot much more complex. If the shutter speed is not sufficiently reduced, the photo will be blurred and to be thrown away.
In these situations, it is difficult to shoot with shutter speeds slower than 1 / 100s, while it is likely to have to use much faster shutter speeds.
As I explained above, it will often be necessary to close the diaphragm very much, to have the whole subject in focus. As a result, the amount of light hitting the sensor decreases and, for the exposure triangle, it becomes necessary to increase the exposure time or ISO.
Having to keep the ISO low to reduce noise, the only solution is often to use slower exposure times, exactly the opposite of what we would need. It will therefore be necessary to create favorable light situations, which I will explain later.
 Goodbye autofocus
In 99% of cases, your photos are taken with autofocus. Manual focus, especially in the beginning, is definitely difficult, even if you learn with training.
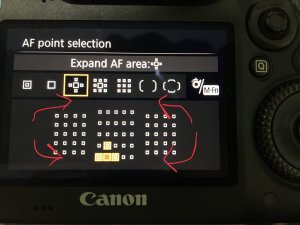
In macro photography, the subjects are so small and the depth of field so shallow that autofocus has a hard time focusing exactly where you want. Think for example of a photo of an insect, where you want to focus on one eye. How big can it be: 1,2mm?
So you need to rely on manual focus and your own eye. Those with cheaper SLRs are at a disadvantage because they usually have a smaller and darker viewfinder than their more advanced sisters.
So I advise you to use the LiveView (when available) and also activate the depth of field preview to evaluate if the part in focus is actually what you want.
The best light in macro photography
The particular shooting conditions in macro photography (small aperture, sometimes high safety times, close range) inevitably decrease the amount of light available.
It is, therefore, necessary to create shooting situations with abundant light. The most obvious thing is to try to photograph during the brightest hours of the day, outdoors.
The dazzling light of the midday sun, in many cases, allows for a very fast exposure time. When the sun is at its peak, however, beware of the shadows. In macro photography, a small shadow can completely obscure the subject or a significant part of it.
A small reflector, positioned just outside the frame, is the simplest solution to give direction to the light and lighten the shadows.
In very low light situations, using a flash can become extremely useful. As you know, the built-in flash is not recommended. Very close shooting conditions make it even more difficult to manage this direct and powerful light.
Using an external flash mounted on the camera does not improve the situation much. A good solution, however, is to use the flash separate from the camera. To do this you have two options:
- use a special cable to connect the flash to the camera (such as Nikon Sc-28 Ttl or Canon OC-E3),
- use a wireless flash trigger.
Finally, the more specialized choice is that of the flash dedicated to the macro. These are specific flashes for this photographic genre. There are several models, such as those that mount on the sides of the lens. Or the more modern “rings”. You can find some references on this Amazon page.
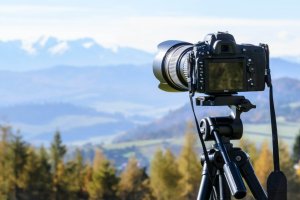 Avoid blurred photos with a tripod
You probably already know that in many cases the use of a tripod is necessary to avoid blurry photos. For example at sunset, when the light is low.
Even in macro photography, it can happen to work in very low light, due to the small aperture and short exposure time. Also, working at long focal lengths, blur is amplified. Therefore it is better to bring a tripod.
Depending on what your favorite macro subjects are, a question may already have arisen: but how do I track a moving subject if the camera is fixed on its support? Indeed, when photographing small animals or insects, the question becomes rather thorny.
An intermediate solution consists in obtaining a tripod with an articulated head. It allows you to rotate the camera freely around the point on which it is fixed.
Obviously, if the framed subject moves too far away or moves vertically, the probability of losing it will still be high. But in many cases, this can be a good one.
A middle ground between the freedom of the free hand and the rigidity of the tripod is the monopod . It is basically a stick to the top of which you attach the camera. It too can have an articulated head.
With the monopod you reduce the vibrations impressed on the camera when shooting hand-held, but you are partially more free to move in pursuit of your subjects. Obviously, it’s not as effective as a tripod.
Complete Guide To Macro Photography | Video Explanation
Do not touch the camera!
In addition to the tripod, a remote shutter release also comes in handy to reduce the risk of blurred photos. Pressing the shutter button inevitably causes camera shake.
